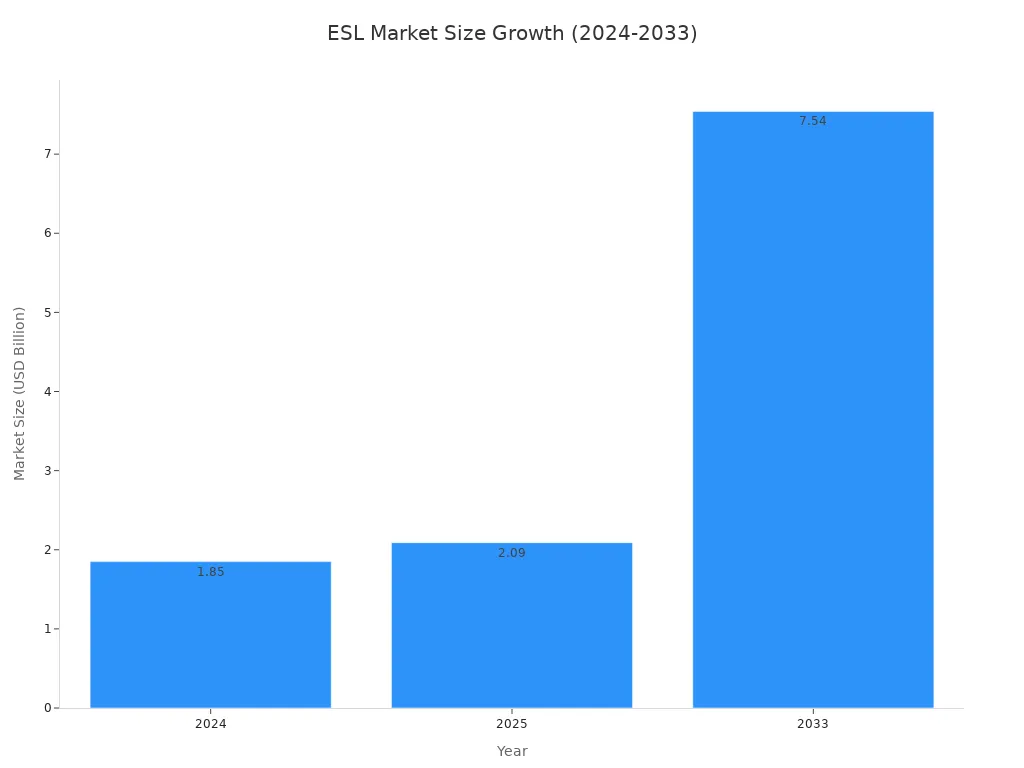
You are upgrading your Esl Retail operations by adopting a modern solution. The market for Electronic Shelf Labels is expanding rapidly, driven by the need for operational efficiency and pricing accuracy.
Before You Begin 📝 To successfully install electronic shelf hardware, first prepare your workspace. You need a clean, spacious area. Gather your tools, including a box cutter and a mobile device. Designate separate zones for unboxing each ESL Price Tag, the ESL Gateway AP, and initializing the system.
Step 1: Unbox and Inspect Your Hardware
You are now ready to handle the physical components of your new system. This initial step is crucial for a smooth installation. A careful and methodical approach to unboxing prevents future complications.
Verify Your Component List
First, open your shipment and locate the packing slip. You should cross-reference its contents with the items in the box. A standard system consists of three primary elements:
- Label Management Software: This program manages system configuration and data transmission.
- Communication Station (Gateway): It ensures stable, long-distance communication from the software to the labels.
- Terminal Displays (Labels): These devices receive data and display prices.
Your kit will likely contain the gateway, accessories, and a variety of electronic shelf label sizes (e.g., 2.1″, 4.2″, 7.5″). Each label is a sophisticated device, typically containing an E-ink display, a radio, a microcontroller, and batteries. Confirm every component is present before proceeding.
Inspect for Shipping Damage
Next, you must inspect each component for damage that may have occurred during transit. Carefully examine the gateway for any cracks or loose parts. Check the screens of the labels for any signs of physical impact, like fractures or discoloration.
Pro Tip: Document any damage immediately. Take clear photos of the affected components and the shipping box. Contact your supplier right away to report the issue and arrange for replacements. This action ensures your project stays on schedule.
Organize Your Labels and Accessories
A well-organized workspace improves efficiency. Group your labels by size or intended department. Place all mounting rails, clips, and other accessories into a separate, clearly marked container. This simple organization saves you significant time during the mounting phase. Keeping your components sorted and accessible makes the entire setup process faster and less prone to error.
Step 2: How to Install Electronic Shelf Label Software

With your hardware organized, you will now install the software that powers your electronic shelf labeling system. This central program acts as the command center for your entire setup. A proper software installation is essential for a functional system.
Check System Compatibility
Before you begin, you must confirm your computer’s operating system is compatible with the ESL management software. Most providers offer flexible solutions, but requirements can vary. You should check the documentation from your specific provider. Many platforms support common operating systems.
| Software Platform | Supported Operating Systems |
|---|---|
| RECHI ESL-SW | Windows, Mac |
| ZKONG Cloud Platform | Windows, Mac OS, Android, iOS |
| Minewtag ESL Platform | PC and Mobile App |
Verifying compatibility first prevents installation issues and ensures the software runs smoothly.
Install the Management Software
You are ready to install the ESL management software. For a server-based setup, you typically need administrator rights. The process involves running an installer file and selecting the necessary components for your system.
Follow these general steps for a successful installation:
- Ensure your server has the required framework, like .NET 4.6.1 or higher.
- Run the setup file (e.g.,
SetupEslServer.msi) with administrator privileges. - Select the core components during the installation wizard.
- Include drivers for any USB devices if they are not already present.
- Enable the Web Service or API options if you plan to integrate with other programs.
Configure Your Gateway
The final step is to configure your gateway. This device connects your ESL management software to each electronic shelf label. You will need to access its configuration panel through a web browser. To do this, connect the gateway to your network and enter its IP address into your browser’s address bar.
Gateway Access Info 🔑 Most gateways use a default IP address like
192.168.1.1or192.168.100.1. You can then log in with common credentials such asadminfor both the username and password. Always change these defaults to secure your network.
Once logged in, you can set a static IP address and point the gateway to your server. This action completes the software setup and prepares you to install electronic shelf labels. You are now ready to connect your hardware to the new system.
Step 3: Activate and Connect Electronic Shelf Labels
You have successfully configured the software and gateway. Now you will activate your electronic shelf labels and link them to the management system. This step brings your digital pricing tags to life, preparing them for deployment on your shelves. The activation method varies depending on the label model you have.
Initialize Labels with Buttons
Many electronic shelf label models include a physical button for activation. This process is straightforward and allows for quick, manual initialization. You can efficiently prepare your esl shelf price tags for connection.
Follow this standard procedure to activate your new labels:
- Hold the electronic shelf label in your hand.
- Locate the small button, often found on the side or back.
- Press the button firmly with your thumb.
- Hold it for approximately 2 seconds until the screen flashes or displays an initialization message.
The label is now in pairing mode. It is ready to be discovered by your gateway and management software.
Initialize Labels Without Buttons
Modern esl electronic shelf price tags often lack physical buttons for a sleeker, more durable design. You will use Near Field Communication (NFC) to activate these devices. An NFC controller or a compatible mobile device powers them on. This technology enables faster updates and improves responsiveness at the shelf.
You simply tap the NFC-enabled device to a specific point on the label. The label’s screen will then display a confirmation, indicating it is active and broadcasting its signal. This method is common for advanced models like the V300 BWR Series, which use NFC to share more extensive information. This feature is a key part of how you install electronic shelf hardware efficiently.
Confirm Successful Connection
After activating your esl pricing tags, you must confirm their connection to the system. You can do this through your ESL management software. The software dashboard should display a list of all active devices.
Verification Tip ✅ Navigate to the “Labels” or “Devices” section in your software. You should see your newly activated digital shelf price tags appear with a “Connected” or “Online” status. You can test the connection by sending a template or a test price update to a single label.
A successful update confirms that the label is fully integrated into your system. You can now proceed with confidence, knowing your digital price tags are communicating correctly with the central server.
Troubleshoot Connection Errors
You may occasionally encounter a label that fails to connect. This is a normal part of any large-scale technology deployment. You can resolve most connection issues quickly by following a systematic troubleshooting process. Do not worry if a few labels are stubborn; a logical approach will identify the root cause.
First, confirm the label is properly activated. A label that did not complete the initialization step will not appear in the software. You should try the activation process again, whether using a button or NFC. A successful activation is the foundation for a successful connection.
If activation is not the problem, you should investigate these common sources of connection failure:
- Signal Range: Your labels might be too far from the gateway. Check the maximum communication distance specified by your provider and ensure the problematic labels are within that range.
- Physical Obstructions: Dense shelving, metal pillars, or thick concrete walls can block or weaken the gateway’s signal.
- Radio Frequency (RF) Interference: Other wireless devices, such as Wi-Fi routers, cordless phones, or microwave ovens, can interfere with the gateway’s signal. Try to position your gateway away from these sources.
Gateway Status Check 📡 Your gateway has status lights that provide valuable diagnostic information. A solid green light typically indicates a healthy connection to the network and server. A blinking or red light often signals an issue. You should consult your gateway’s manual to understand what each light pattern means for your specific model.
Your management software is another powerful diagnostic tool. The system logs often record detailed error messages that can pinpoint the exact problem. You can also use the software to check the battery level of the specific electronic shelf label. A low battery is a frequent cause of poor connectivity.
Finally, you can use a simple table to diagnose common issues. This helps you quickly identify and solve problems affecting your electronic shelf labels.
| Symptom | Possible Cause | Solution |
|---|---|---|
| Label screen is blank | Dead battery or failed activation | Replace the battery or re-initialize the label. |
| Label shows “Disconnected” | Out of range or signal interference | Move the label closer to the gateway or remove obstructions. |
| Multiple labels in one area fail | Gateway issue or local interference | Reboot the gateway. Check for new sources of RF interference. |
By methodically working through these steps, you can diagnose and fix nearly any connection error. This ensures your entire system remains reliable and fully operational.
Step 4: Mount Your DIY Electronic Shelf Label Management System
You have now reached the final hands-on stage: the physical mounting of your hardware. This step transforms your collection of components into a cohesive and functional diy electronic shelf label management system. A precise and careful approach here ensures your labels are secure, easy to read, and professionally presented.
Attach Rails to Shelving
The foundation of your label mounting is the rail system. You must first attach these rails securely to your shelving units. The type of rail and mounting method you use will depend entirely on your shelf material.
Choosing the right profile is your first decision. Most providers offer a variety of rails designed for specific shelf types.
- For Metal Shelves: You can find profiles made for specific gondola systems (like Tego, CAEM, or Cefla) or use rails with an adhesive flap for flat metal surfaces.
- For Wooden Shelves: You can use screwed base rails for a permanent fixture. Alternatively, adhesive pads or double-sided foam tape work well on smooth wood surfaces.
- For Glass Shelves: Special profiles designed for 8mm to 10mm thick glass are available. Universal rails like the CP4C or CPIF models also use strong foam tape for a secure bond on glass.
Once you select the appropriate rails, you will perform the installation. Gather your tools, which may include a measuring tape, a spirit level, and a non-permanent marker.
Alignment Best Practices 📏 Proper alignment is critical for a professional look. You should position each rail so it is straight and parallel to the front of the shelf. Use a spirit level to confirm the track is perfectly horizontal. A measuring tape helps you maintain consistent spacing, ensuring your
diy electronic shelf label management systemlooks uniform across the entire aisle.
Use your marker to create guide points before attaching the rail. If using screws, be careful not to overtighten them, as this can crack the PVC rail. If using adhesive, clean the shelf surface thoroughly and press the rail firmly to ensure a strong bond.
Securely Mount Each Label
With your rails in place, you are ready to assemble esl components by attaching each label. This final step requires you to select the correct mounting accessory to connect the label to the rail. This ensures your digital price tags are held firmly at the optimal viewing angle.
A wide range of clips, clamps, and adapters are available. Your choice depends on the label model and the specific retail environment. Dovetail adapters, for instance, serve as a universal intermediate piece, making brands like Hanshow, Pricer, and SoluM compatible with various fittings.
| Accessory Type | Best Use Case | Attachment Method |
|---|---|---|
| Dovetail Adapter | Universal fitting for major ESL brands | Slides or clips onto the rail and label |
| Pegboard Hook | Attaching labels to pegwall displays | Hooks directly into pegboard holes |
| Universal Clamp | Securing heavier signs or frames | Clamps onto the shelf edge for a strong grip |
| Magnetic Holder | Metal surfaces and endcaps | Attaches magnetically for easy repositioning |
When you install electronic shelf labels, your goal is consistent height and angle. This maximizes readability for your customers. You should position each electronic shelf label at eye-level, considering natural sight lines from the aisle. This is a key part of a successful installation.
Achieving Optimal Visibility 👀 To ensure every customer can easily read the display, you must
install electronic shelfhardware with accessibility in mind. Position labels to avoid glare from overhead lighting. Following ADA guidelines for height and angle ensures yoursystemis usable by everyone. By mapping zones and using appropriate hardware—like snap-on rails for gondolas and rugged hinge rails for high-traffic areas—you protect the labels from bumps and maintain a secure, consistent placement.
By carefully mounting each component, you complete the setup of your diy electronic shelf label management system. Your new system is now physically integrated into your store, ready to display dynamic pricing and product information with clarity and precision.
Your electronic shelf label system is now fully installed and operational. The next step is to link products to your labels. You will use the esl management software for this task. This powerful system equips you to manage pricing with greater efficiency and accuracy.
With the esl management software, you can roll out flash sales instantly. The esl management software also automates updates to prevent pricing errors. This capability makes your esl management software essential for modern retail.
FAQ
How long do the batteries in electronic shelf labels last?
You can expect the batteries in your electronic shelf labels to last between 5 and 10 years. The lifespan depends on the label model, the frequency of price updates, and the operating temperature of your store. Most systems alert you when a battery is low.
Can I integrate the ESL system with my current POS?
Yes, you can integrate the ESL system with your existing Point of Sale (POS) software. Most ESL management platforms provide an Application Programming Interface (API). This API allows your POS system to communicate directly with the labels for seamless, automated price synchronization.
What is the typical communication range of a gateway?
A single gateway typically covers a radius of 25-30 meters (approximately 80-100 feet) in a standard retail environment. You should place gateways strategically to ensure complete coverage. Physical obstructions like metal shelving or concrete walls can reduce this range.
Pro Tip 💡 You can use multiple gateways in larger stores. The management software allows you to create a mesh network, extending signal coverage across your entire sales floor without any dead zones.
How do I update prices on the labels after setup?
You update prices using the ESL management software. First, you link each label to a specific product in your database. Then, you can change the price in the software, and it will automatically push the update to the corresponding label on the shelf.